How to Get Auto Clicker for School Chromebook? [3 Simple Ways]
Learn how to download auto clicker for school Chromebook & how to install auto clicker for school Chromebooks.
Chromebooks are excellent for students. It provides speed, mobility, and great efficiency while taking notes, doing homework, and other things.
With support for android apps, Chromebooks are also excellent for students for occasional gaming and entertainment as well.
To top it off, features like auto-click for Chromebook have brought endless possibilities for students to automate many of their repetitive tasks.
Why do Students Need Auto-Clicker on Their Chromebook?
Chromebooks’ auto-clicker feature is extremely popular among students for its unmatched speed at doing repetitive tasks.
For example, if you are doing some data entry work where there is a set pattern of clicks, you can automate that work easily with auto-clicker.
I’m listing some other use cases for auto-clicks for you:
- If you are doing some work that needs frequent clicking, you can reduce the stress on your fingers by setting up auto clicker
- If you are gaming, let’s say, Minecraft, you can quickly build blocks with auto clicker
- Similarly, if you are playing a point-and-shoot game, you can use auto-clicker to constantly shoot easily.
- If you are using spreadsheets, you can quickly shift from one cell to another cell Apart from these, auto clickers can be used in many ways; you just have to look for repetitive clickable tasks, and it will take care of them.
How to Use Auto Clicker for School Chromebook?
You can use an auto-clicker on a school Chromebook in multiple free ways.
But there’s nothing better than a native application that lets you auto-click. It’s more convenient than using a third-party auto-clicker
Method 1: Use the Built-in Auto-clicker
Here’s a step-by-step guide to turning on the auto-clicker for a school Chromebook.
- Step 1: On your Chromebook, press Alt + Shift + S.
- Step 2: Select Settings > Advanced.
- Step 3: You can see the “Accessibility” option. Click on “Manage accessibility.”
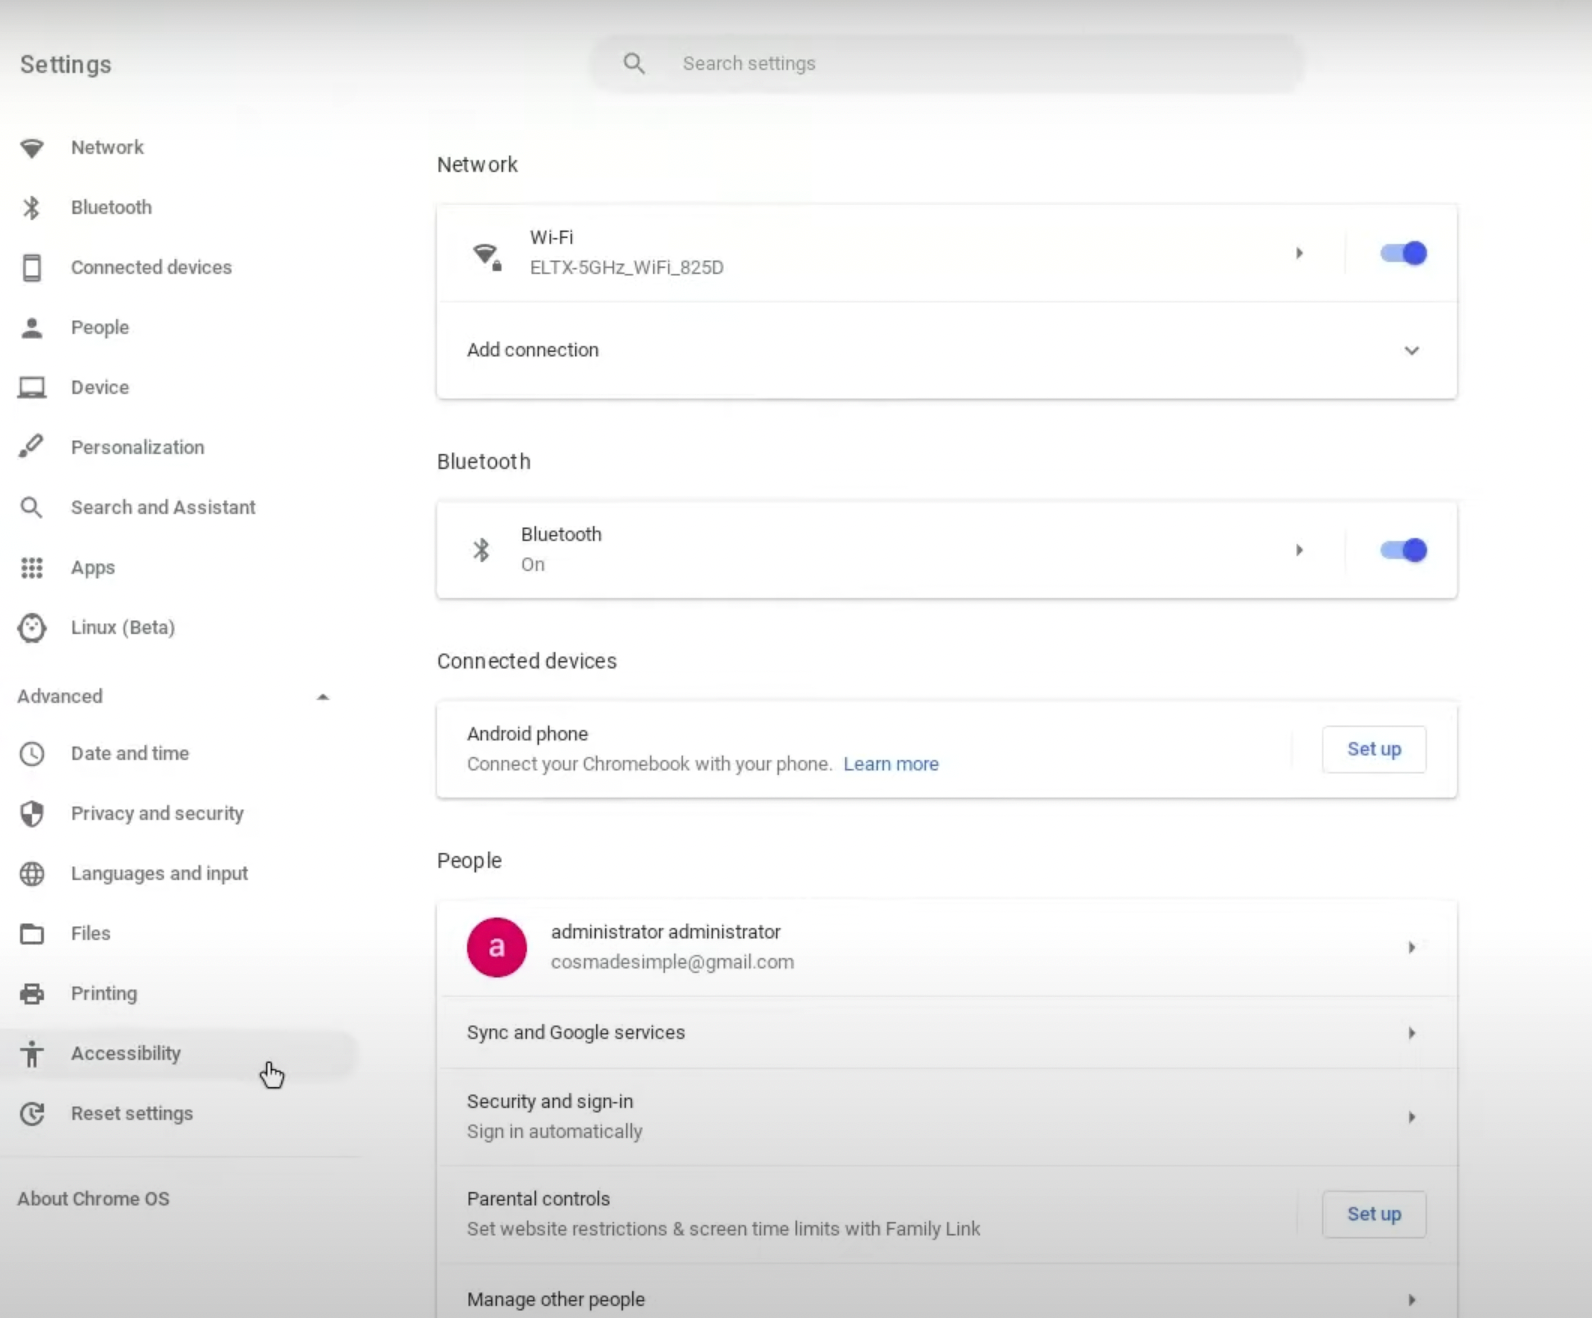
- Step 4: Expand on the “Mouse and touchpad” section, and select the option “Automatically click.”
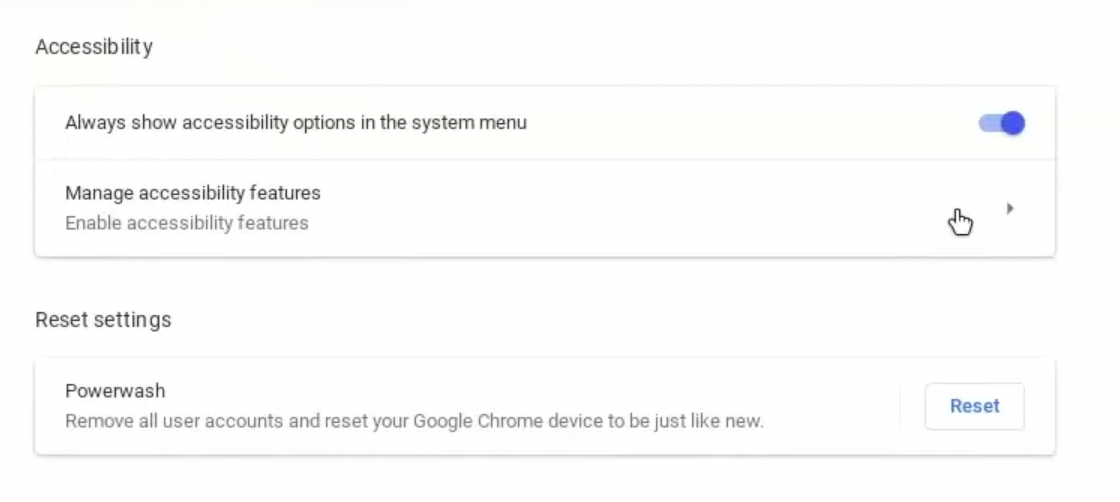
- Step 5: You can customize some settings to suit your needs, such as click delay, stabilizing click location, movement threshold, etc.
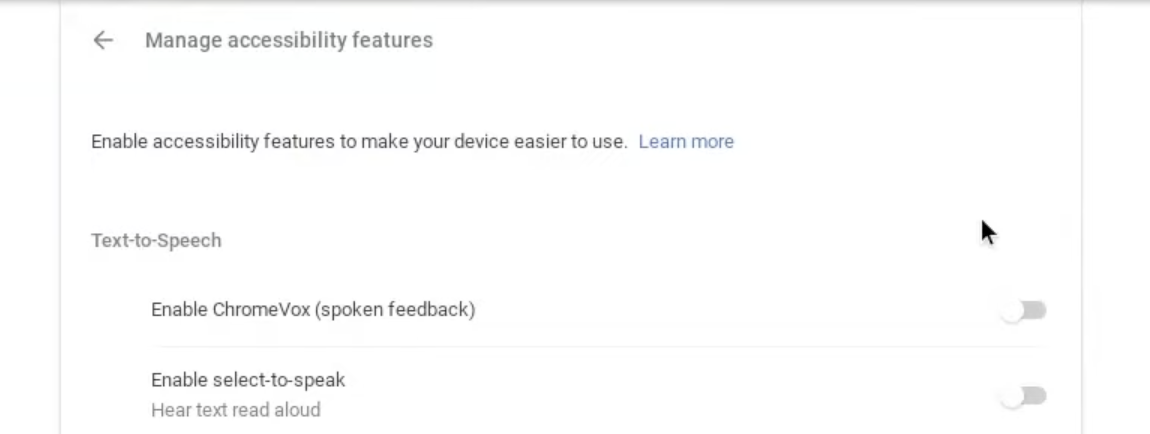
- Step 6:After turning on the automatic click, you can use different functions to customize the function.
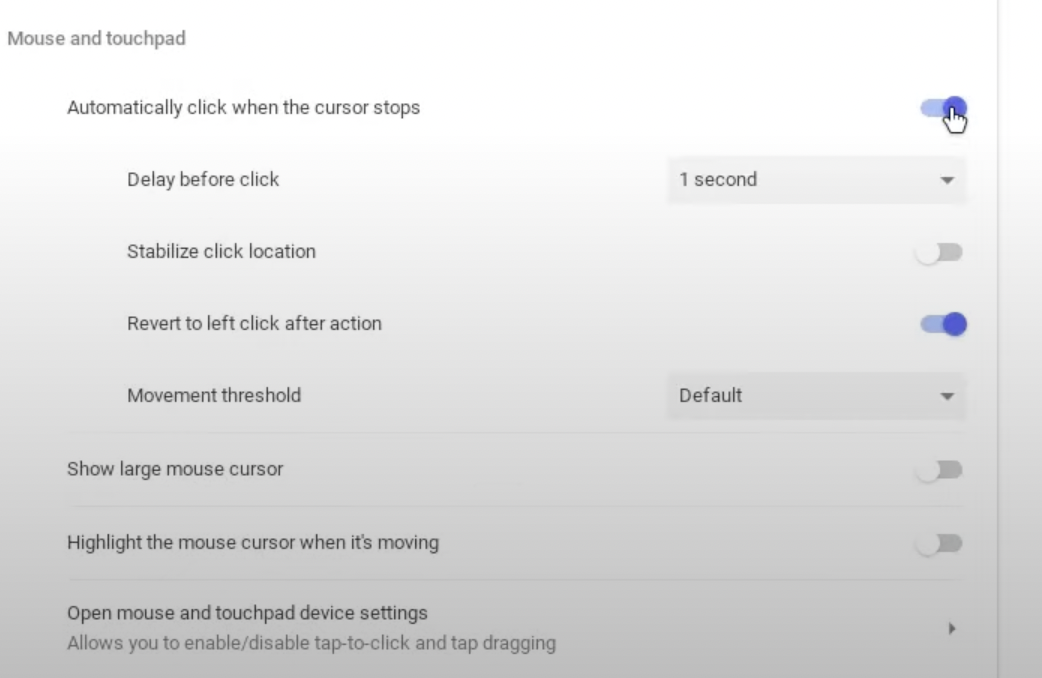
- Delay before clicking: You can choose the duration between automatic clicks between 0.6 to 4 seconds.
- Stabilize click location: It keeps the ring fixed until the cursor is moved outside.
- Revert to left click after action: This smart feature automatically returns to left click after you trigger a right-click or double-click.
- Movement threshold: It increases the range of clickable area for auto-clicking
- Return to left-click after activity: This intelligent feature lets you return to left-click after you trigger alternative activity, such as double-click or right-click.
- Movement Threshold: Enabling this feature will give you the power to expand the range of auto-clicking and let you click items that lie in a certain range.
Method 2: Install Auto-Clicker Extension for Browser
Unfortunately, the auto-click feature for a school Chromebook may be blocked by default. In that case, you can use third-party auto-clicker extensions to enable auto-clicker for Chromebook.
Top 3 Free auto clickers for school Chromebook Download
Here are the top three auto clickers for Chromebook:
Version: 3.4.3 | Updated: January 12, 2022
Pros:
- Different custom features
- Good documentation
Cons:
- Too complicated to use for common users
- Buggy
Version: 1.1 | Updated: February 21, 2022
Pros:
- Easily customizable
Cons:
- Complicated to start working
- Hit or miss for different machines
Version 1.4.0 | Updated: 8 January 2022
Pros:
- Simplest auto clicker
Cons:
- It’s a little bit slower, but it works.
Method 3: How to Get Autoclicker for Chromebook: With Script
As you can see that these third-party tools are pretty much hit-and-miss. But there’s one way to use an auto-clicker on your school Chromebook, which pretty much guarantees success.
It’s to create your won auto-clicker script.
Here’s a step-by-step guide to creating your auto-clicker script.
Step 1: Copy the following code.
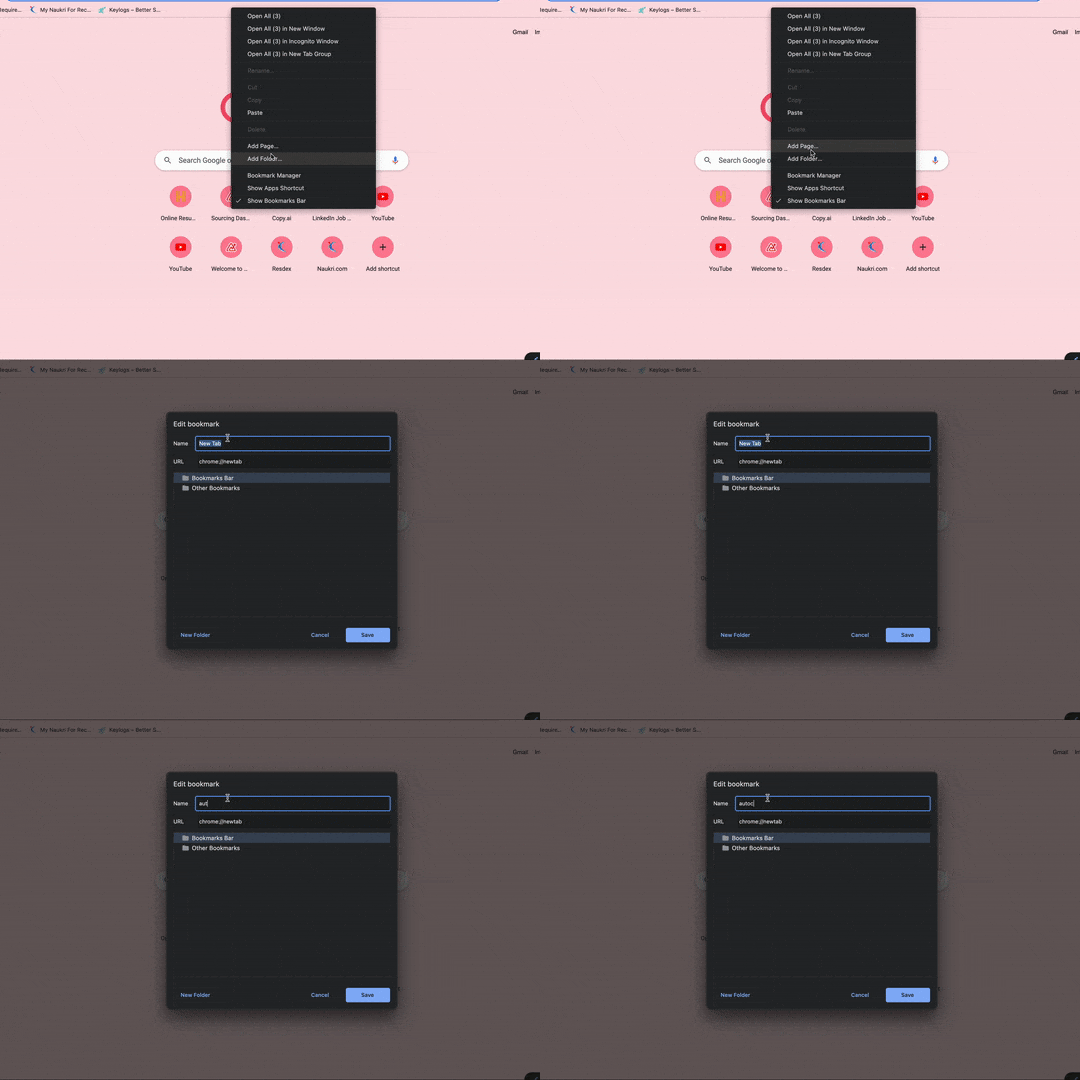
javascript:var DELAY = 1;var autoClickerStyleElement = document.createElement("style");autoClickerStyleElement.innerHTML="*{cursor: crosshair !important;}";document.body.appendChild(autoClickerStyleElement);function addClicker(e) {if(!e.isTrusted) {return;}if(e.target.classList.contains("auto-clicker-target")) {e.target.classList.remove("auto-clicker-target");} else {e.target.classList.add("auto-clicker-target");}document.body.removeChild(autoClickerStyleElement);document.body.removeEventListener("click", addClicker);e.preventDefault();autoClick(e.target);}function autoClick(element) {if(element.classList.contains("auto-clicker-target")) {element.click();setTimeout(function(){ autoClick(element); }, DELAY);}}document.body.addEventListener("click", addClicker, 0);Step 2: Right-click on the bookmark bar. Then, click on “Add page.”
- Step 3: Give it the name “Autoclick.”
- Step 4: On the URL section, paste the above-mentioned code.
- Step 5: Now, click save.
- Step 6: Congratulations! You’ve installed auto-clicker on your Chromebook.
To run the auto clicker, click once on the bookmark “Autoclick,” and then click on the button you want to click repeatedly.
To stop it, again click on the bookmark auto-click, and then click on the same area where you initiated the click.
Here is a small tutorial for you:
FAQ:
How to Get an Auto-Clicker on Chromebook for Roblox?
There are multiple websites on Google providing auto-clicker for Roblox. Such as clickspeedtest.info, sourceforge.net, github, etc.
Here’s a script you can run to use Roblox auto-clicker.
--// Credits \\--
--[[ Ezpi#0474 - Creator of this script ]]--

--// Services \\--
local CoreGui = game:GetService("CoreGui")
local Players = game:GetService("Players")
local VirtualInputManager = game:GetService("VirtualInputManager")

--// Variables \\--
local Player = Players.LocalPlayer
local Enabled = false
local Mouse = Player:GetMouse()
local X, Y = 0, 0
local LastC = Color3.new(1, 0, 0)
local LastU = tick()

--// Exploit Fix \\--
if not pcall(function() return syn.protect_gui end) then
    syn = {}
    syn.protect_gui = function(A_1)
        A_1.Parent = CoreGui
    end
end

--// UI Library \\--
local Library = loadstring(game:HttpGetAsync('https://pastebin.com/raw/edJT9EGX'))()
local Window = Library:CreateWindow("AutoClicker by Ezpi")
Enabled_1 = Window:AddColor({
    text = 'Status:',
    flag = "Ezpi_1",
    color = Color3.new(1, 0, 0),
    callback = function(A_1)
        -- "Enabled" Color
        local NewColor = Color3.new(0, 1, 0)
        if Enabled == false then
            NewColor = Color3.new(1, 0, 0)
        end
        if NewColor ~= Last or A_1 ~= NewColor then
            Last = NewColor
            Enabled_1:SetColor(NewColor)
        end
    end
})
Window:AddBind({
    text = 'Toggle',
    callback = function()
        -- Toggle
        Enabled = not Enabled
        -- "Enabled" Color
        local NewColor = Color3.new(0, 1, 0)
        if Enabled == false then
            NewColor = Color3.new(1, 0, 0)
        end
        if NewColor ~= Last then
            Last = NewColor
            Enabled_1:SetColor(NewColor)
        end
        -- Click Position
        if Enabled then
            -- Update Mouse Pos
            X, Y = Mouse.X, Mouse.Y + 10
            -- Update Box
            Box_1:SetValue()
        else
            X, Y = 0, 0
            Box_1:SetValue()
        end
        -- AutoClick
        while Enabled do
            VirtualInputManager:SendMouseButtonEvent(X, Y, 0, true, game, 1)
            VirtualInputManager:SendMouseButtonEvent(X, Y, 0, false, game, 1)
            wait(Library.flags.Interval)
        end
    end
})
Window:AddSlider({
    text = 'Interval',
    min = 0.01,
    max = 2,
    value = 1,
    float = 0.01
})
Box_1 = Window:AddBox({
    text = "AutoClick Position:",
    value = "X: " .. X .. ", Y: " .. Y,
    callback = function()
        if tick()-LastU > 0.1 then
            LastU = tick()
            Box_1:SetValue("X: " .. X .. ", Y: " .. Y)
        end
    end
})
Library:Init()
What Is The Best Auto Clicker for Chromebook?
We have provided a list of auto clickers that are best for Chromebooks. Here are those:
I hope this guide gives you a way to simplify your life and automate some of your workflow.
If you need further help, you can connect with me on LinkedIn and Twitter
Go to my Portfolio
Read my other blogs:
![How to Get Auto Clicker for School Chromebook? [3 Simple Ways]](https://cdn.hashnode.com/res/hashnode/image/upload/v1665552549270/w5SMIHMWP.jpg?w=1600&h=840&fit=crop&crop=entropy&auto=compress,format&format=webp)